Table of Content
Intro
Hello hackers, it’s been awhile since my last blogpost. Today we’re gonna talk more about specific topic in Android pentest (RASP). Android applications are growing rapidly every year compared to the year before. Despite the fact that private sectors and companies worldwide are struggling to secure their Android applications due to the huge attack surface, one approach businesses can take is to implement their own protections while building the application. However, this is an interim solution to protect their applications from being reverse-engineered or attacked by malicious actors. Another option is to seek an all-in-one solution that can provide a high level of security against reverse engineering, tampering, and/or hooking techniques. This is often referred to as Runtime Application Self-Protection (RASP). In this blog, we’ll dive deep into how such solutions work or implemented in terms of both the code and reverse-engineering (the developer and attacker mindsets).
Java World
As you may know, there are two main languages for building Android apps: Java and Kotlin. While both are popular nowadays, Java is older, widely used, has a vast ecosystem, and strong community support. We will use it to explore how RASP solutions can be built. You can see in the following examples how some detection checks such as root can be implemented.
Root Check
SU binaries or SuperUser are crucial component of Android root access. It allowing the user or the application to gain super user permissions, access or modify system componenets that are restricted by default.
private static boolean checkSuperUserBinary() {
    String[] paths = {
            "/sbin/su",
            "/system/xbin/su",
            "/system/bin/su",
            "/system/sd/xbin/su",
            "/system/bin/.ext/su",
            "/system/sd/xbin/.ext/su",
            "/system/xbin/daemonsu",
            "/system/xbin/su",
            "/system/su",
            "/data/local/xbin/su",
            "/data/local/bin/su",
            "/data/local/su",
            "/data/su"
    };
    for (String path : paths) {
        if (new File(path).exists()) {
            return true;
        }
    }
    return false;
}
Basically, the snippet above looks for
su
binaries in some directories and check if such file exists, if
so it will return true.
Keep noted,
subinaries can be also hidden in another directory or path so that such checks fail to detect if a device is rooted or not, so be aware of that.
Emulator Check
Emulators become extremely handy when it comes to testing
Android apps, so it’s super important to check whether is an app
is being run on emulator or not. RASPs will look for some system
or hardware properties such as, CPU model, brand, device
manufacturer, …etc. Such system properties can be found in
/system/build.prop
as shown below.
star2qltechn:/ # cat /system/build.prop

# begin build properties
# autogenerated by buildinfo.sh
...
ro.build.version.min_supported_target_sdk=17
ro.build.date=Wed Jul 10 10:20:27 CST 2024
ro.build.date.utc=1720578027
ro.build.type=user
ro.build.user=build
ro.build.host=dev
ro.build.tags=release-keys
ro.build.flavor=aosp-user
ro.build.system_root_image=true
ro.product.model=AOSP
ro.product.brand=samsung
ro.product.name=ld_aosp_x86_64
ro.product.device=star2qltechn
# ro.product.cpu.abi and ro.product.cpu.abi2 are obsolete,
# use ro.product.cpu.abilist instead.
ro.product.cpu.abi=x86_64
ro.product.cpu.abilist=x86_64,x86,arm64-v8a,armeabi-v7a,armeabi
ro.product.cpu.abilist32=x86,armeabi-v7a,armeabi
ro.product.cpu.abilist64=x86_64,arm64-v8a
ro.product.manufacturer=Google
ro.product.locale=en-US
# end build properties
#
# from build/make/target/board/gsi_system.prop
#
# GSI always generate dex pre-opt in system image
ro.cp_system_other_odex=0

# GSI always disables adb authentication
ro.adb.secure=0

# TODO(b/78105955): disable privapp_permissions checking before the bug solved
ro.control_privapp_permissions=disable

#
# ADDITIONAL_BUILD_PROPERTIES
#
vendor.rild.libpath=/vendor/lib64/libmtk-ril.so
keyguard.no_require_sim=true
ro.com.android.dataroaming=true
ro.config.ringtone=Ring_Synth_04.ogg
ro.config.notification_sound=pixiedust.ogg
ro.carrier=unknown
ro.config.alarm_alert=Alarm_Classic.ogg
ro.dalvik.vm.native.bridge=0
dalvik.vm.heapstartsize=8m
dalvik.vm.heapgrowthlimit=192m
dalvik.vm.heapsize=384m
dalvik.vm.heaptargetutilization=0.75
dalvik.vm.heapminfree=512k
dalvik.vm.heapmaxfree=8m
...
Next, the following snippet can be implemented to get those properties and check for unknown models, brands, or even manufacturer names.
private static boolean checkForEmulatorProps() {
    String[] dangerousProps = {
            "ro.build.tags",
            "ro.product.device",
            "ro.product.brand",
            "ro.product.model",
            "ro.product.name",
            "ro.product.manufacturer"
    };
    for (String prop : dangerousProps) {
        String propValue = getSystemProperty(prop, "");
        if (propValue != null && (propValue.contains("test-keys") ||  propValue.contains("unknown"))) return true;
    }
    return false;
}

private static String getSystemProperty(String propName, String defaultValue) {
    try {
        Class<?> systemProperties = Class.forName("android.os.SystemProperties");
        return (String) systemProperties.getMethod("get", String.class, String.class).invoke(null, propName, defaultValue);
    } catch (Exception e) {
        return defaultValue;
    }
}
Here’s basic check function found in real RASP solution that
looks for
ro.build.tags
and
/system/xbin/su
binary along with
Superuser.apk
file.
Today most mobile emulators are allowing users to change those values to forge normal devices’ behavior so such checks will fail to detect.
Some other checks can be used for emulation detection, such as looking for certain device features, virtual sensors, or specific applications or packages installed on the system related to specific emulator brands or versions.
public boolean hasKnownEmulatorPackages(Context context) {
    String[] knownEmulators = {"com.android.emulator", "com.genymotion"};
    PackageManager packageManager = context.getPackageManager();
    List<ApplicationInfo> installedApps = packageManager.getInstalledApplications(0);

    for (ApplicationInfo appInfo : installedApps) {
        for (String emulator : knownEmulators) {
            if (appInfo.packageName.contains(emulator)) {
                return true; // It's an emulator
            }
        }
    }
    return false;
}
While RASPs check for these conditions, if they successfully find at least one of them, they will immediately terminate the application before it is fully created.
public static boolean isDeviceEmulatorOrRooted() {
    return checkSuperUserBinary() || checkForEmulatorProps() || hasKnownEmulatorPackages();
}

public static void terminateApp(Context context) {
    if (context instanceof Activity) {
        ((Activity) context).finish();
    }
    Process.killProcess(Process.myPid());
    System.exit(0);
}

@Override
protected void onCreate(Bundle savedInstanceState) {
    super.onCreate(savedInstanceState);
    ...
    if(isDeviceEmulatorOrRooted())
        terminateApp(context);
    ...
}
Other checks such as integrity and hooking techniques would be
implemented as well for blocking the bad actors to alter or
patch the application code or even manipulate some
functionalities during app’s runtime. Application’s signature
verification (integrity check) could be implemented using
android.content.pm
library to get the package signature and compare it with an
expected value. Besides, anti-hooking methods ensure that some
libraries are not being loaded in memory during the app’s
runtime or look for specific tools installed on the device
itself such as
xposed
or
frida.
Reversing Android
Reversing Android applications can be challenging at times. However, in most cases, decompilers such as apktool or jadx can successfully decompile and extract Smali code. When Android apps are compiled from Java code, they are translated into bytecode, which can later be converted into Smali. Smali code is a readable format that represents the intermediate language of Android bytecode, which can be used to examine the application’s behavior or functionality.
Bypassing Checks
Be aware that, I’ll be using Smali code from debug build so you can easily reverse and read the instructions. In release builds, Smali will be more difficult to read, but you can still use the same approach.
In the following example we’ll examine how the snippets above would be decompiled and how can be reversed. I’ll go with the hard path exploring Smali code so you can get used to it.
Exploring
checkSuperUserBinary():
.method public static checkSuperUserBinary()Z
    .registers 13

    .line 24
    const-string v11, "/data/local/su"
    const-string v12, "/data/su"
    const-string v0, "/sbin/su"
    const-string v1, "/system/xbin/su"
    const-string v2, "/system/bin/su"
    const-string v3, "/system/sd/xbin/su"
    const-string v4, "/system/bin/.ext/su"
    const-string v5, "/system/sd/xbin/.ext/su"
    const-string v6, "/system/xbin/daemonsu"
    const-string v7, "/system/xbin/su"
    const-string v8, "/system/su"
    const-string v9, "/data/local/xbin/su"
    const-string v10, "/data/local/bin/su"
    filled-new-array/range {v0 .. v12}, [Ljava/lang/String;
    move-result-object v0

    .line 40
    .local v0, "paths":[Ljava/lang/String;
    array-length v1, v0
    const/4 v2, 0x0
    move v3, v2
    :goto_21
    if-ge v3, v1, :cond_36
    aget-object v4, v0, v3

    .line 41
    .local v4, "path":Ljava/lang/String;
    new-instance v5, Ljava/io/File;
    invoke-direct {v5, v4}, Ljava/io/File;-><init>(Ljava/lang/String;)V
    invoke-virtual {v5}, Ljava/io/File;->exists()Z
    move-result v5
    if-eqz v5, :cond_32

    .line 42
    const/4 v1, 0x1
    return v1

    .line 41
    :cond_32
    nop

    .line 40
    .end local v4    # "path":Ljava/lang/String;
    add-int/lit8 v3, v3, 0x1
    goto :goto_21

    .line 46
    :cond_36
    return v2
.end method
As you can see, the code defines the string paths from {v0 ..
v12} registers and loop over them, then checks the existance of
at least one of them
invoke-virtual {v5}, Ljava/io/File;->exists()Z. In this case, you can patch the code and modify
const/4 v1, 0x1
to be
const/4 v1, 0x0
which will always return
false.
Or you can change
if-eqz v5, :cond_32
to be
if-nez v5, :cond_32
will do the same going to the last return value which be
false.
Next, exploring
checkForEmulatorProps():
.method public static checkForEmulatorProps()Z
    .registers 7

    .line 50
    const-string v4, "ro.product.name"
    const-string v5, "ro.product.manufacturer"
    const-string v0, "ro.build.tags"
    const-string v1, "ro.product.device"
    const-string v2, "ro.product.brand"
    const-string v3, "ro.product.model"
    filled-new-array/range {v0 .. v5}, [Ljava/lang/String;
    move-result-object v0

    .line 59
    .local v0, "dangerousProps":[Ljava/lang/String;
    array-length v1, v0
    const/4 v2, 0x0
    move v3, v2
    :goto_13
    if-ge v3, v1, :cond_34
    aget-object v4, v0, v3

    .line 60
    .local v4, "prop":Ljava/lang/String;
    const-string v5, ""
    invoke-static {v4, v5}, Lcom/example/shield/AppUtils;->getSystemProperty(Ljava/lang/String;Ljava/lang/String;)Ljava/lang/String;
    move-result-object v5

    .line 61
    .local v5, "propValue":Ljava/lang/String;
    if-eqz v5, :cond_31
    const-string v6, "test-keys"
    invoke-virtual {v5, v6}, Ljava/lang/String;->contains(Ljava/lang/CharSequence;)Z
    move-result v6
    if-nez v6, :cond_2f
    const-string v6, "unknown"
    invoke-virtual {v5, v6}, Ljava/lang/String;->contains(Ljava/lang/CharSequence;)Z
    move-result v6
    if-eqz v6, :cond_31

    :cond_2f
    const/4 v1, 0x1
    return v1

    .line 59
    .end local v4    # "prop":Ljava/lang/String;
    .end local v5    # "propValue":Ljava/lang/String;

    :cond_31
    add-int/lit8 v3, v3, 0x1

    goto :goto_13

    .line 63
    :cond_34
    return v2
.end method
Here, the Smali code is a little different since it will define
the propertie names in
{v0 .. v5}
registers and call the other function
getSystemProperty
and if one of them contains dangrous property
test-keys
or
unknown
it will return
true.
Although, you can see that the
:cond_2f
contains the return value which can be replaced with
const/4 v1, 0x0
that will make the function always return
false.
Native World
Android ecosystem provides an SDK-like toolset in addition to its original SDK, called NDK (Native Development Kit). It allows Android developers to write parts of an application in native code using C/C++. NDK also provides access to native APIs, which can be used to interact with native activities or access device physical components. Additionally, it offers JNI (Java Native Interface), which facilitates communication between Java and C/C++.
Native Root Check
Checking root access in C/C++ is much similar with Java, however in native there’re more APIs to use and combination of them can hinder the bad guys from reversing or manipulate their behavior.
The following example shows how basic root detection function can be written natively.
bool rootCheck() {
    // List of common root binary paths
    std::string paths[] = { "/system/xbin/su", "/system/bin/su", "/sbin/su", "/xbin/su", "/sbin/su", "/system/xbin/su", "/system/bin/.ext/su", "/system/sd/xbin/.ext/su", "/system/sd/xbin/su", "/system/bin/su","/system/xbin/daemonsu","/system/xbin/su","/system/su","/data/local/xbin/su", "/data/local/bin/su", "/data/local/su","/data/su" }
    for (std::string path : paths) {
        if (access(path.data(), X_OK) == 0) { // Check if the file exists and is executable
            return true;
        }
    }
    return false;
}
As you can see, it defines an array of
su
paths, then it loops over them to check whether if at least one
of them has an execute permission
access(path.data(), X_OK). Another approach is by opening the file paths and see if it’s
exist or not.
Emulator Check
Similar to Java, emulator detection in native world can be done
using system properties with
sys/system_properties.h
library.
bool emulatorCheckProps() {
    char buildFingerPrint[PROP_VALUE_MAX];
    char buildModel[PROP_VALUE_MAX];
    char buildTags[PROP_VALUE_MAX];
    __system_property_get("ro.build.tags", buildTags);
    __system_property_get("ro.build.fingerprint", buildFingerPrint);
    __system_property_get("ro.product.model", buildModel);
    return (std::string{buildFingerPrint}.find("generic") != std::string::npos) || \
    (std::string{buildModel}.find("google_sdk") != std::string::npos) || \
    (std::string{buildTags}.find("test-keys") != std::string::npos);
}
Such properties can be varied depends on the emulator type and the values may change.
Writable System Directory Check
In Android devices, the system directory plays a crucial part of the file system that contains essential system files and resources required by the OS the function properly. For security concerns, this directory has only read and execute permissions by default, so that no application can write to it except system apps.
drwxr-xr-x 17 root root 4096 2024-07-10 05:22 systemIf this directory becomes writable it means that the device has root access. Some rooted emulators have added an option to lock/unlock this directory from being writable though.
In the following example shows how this directory can be checked if it has write access or not.
bool checkWritableSystem() {
    // Try writing to a system directory (common locations for rooted devices)
    const char* systemDir = "/system/";
    if (access(systemDir, W_OK) == 0) {
        return true;
    }
    return false;
}
Multiple approaches can also be used with file’s metadata using
statinsys/stat.hlibrary and check for file or directory permissions.
Reversing Native
Reversing native code can be intemidating since it requires you
to have some solid experience with reading assembly instructions
and how the CPU executes them. Although, in some cases having
the base knowledge of reversing Crackmes can
assist you to uncover the hidden secret to bypass those checks
easily. In this part, I’ll be using Ghidra for decompiling
.so
libraries. Feel free to choose IDA or any other disassembly tool
you like.
In Android NDK, there’s a common function called
JNI_OnLoad
that is called when the native library is loaded successfully.
This function is part of the JNI (Java Native Interaface) and
can be used for several action you want to execute once the
library is loaded. You can see it as an entry point for any
Android native library. Many RASPs obfuscate or hide their entry
point so that no one could trace the execution though.
JNIEXPORT jint JNICALL JNI_OnLoad(JavaVM* vm, void* reserved) {
    // Obtain the JNIEnv* pointer
    JNIEnv* env;
    if (vm->GetEnv(reinterpret_cast<void**>(&env), JNI_VERSION_1_6) != JNI_OK) {
        return JNI_ERR; // JNI version not supported
    }
    LOGI("Native library loaded and initialized!");
    // Perform any necessary initialization here
    if(rootCheck() || emulatorCheckProps() || checkWritableSystem()) {
        LOGI("Root or Emulator detected!");
    }
    // Return JNI version
    return JNI_VERSION_1_6;
}
Decompiling Native Library
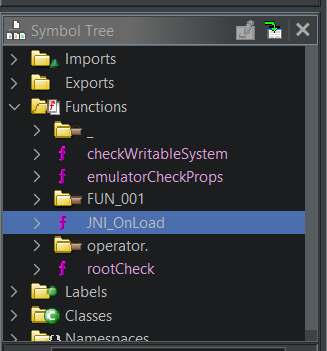
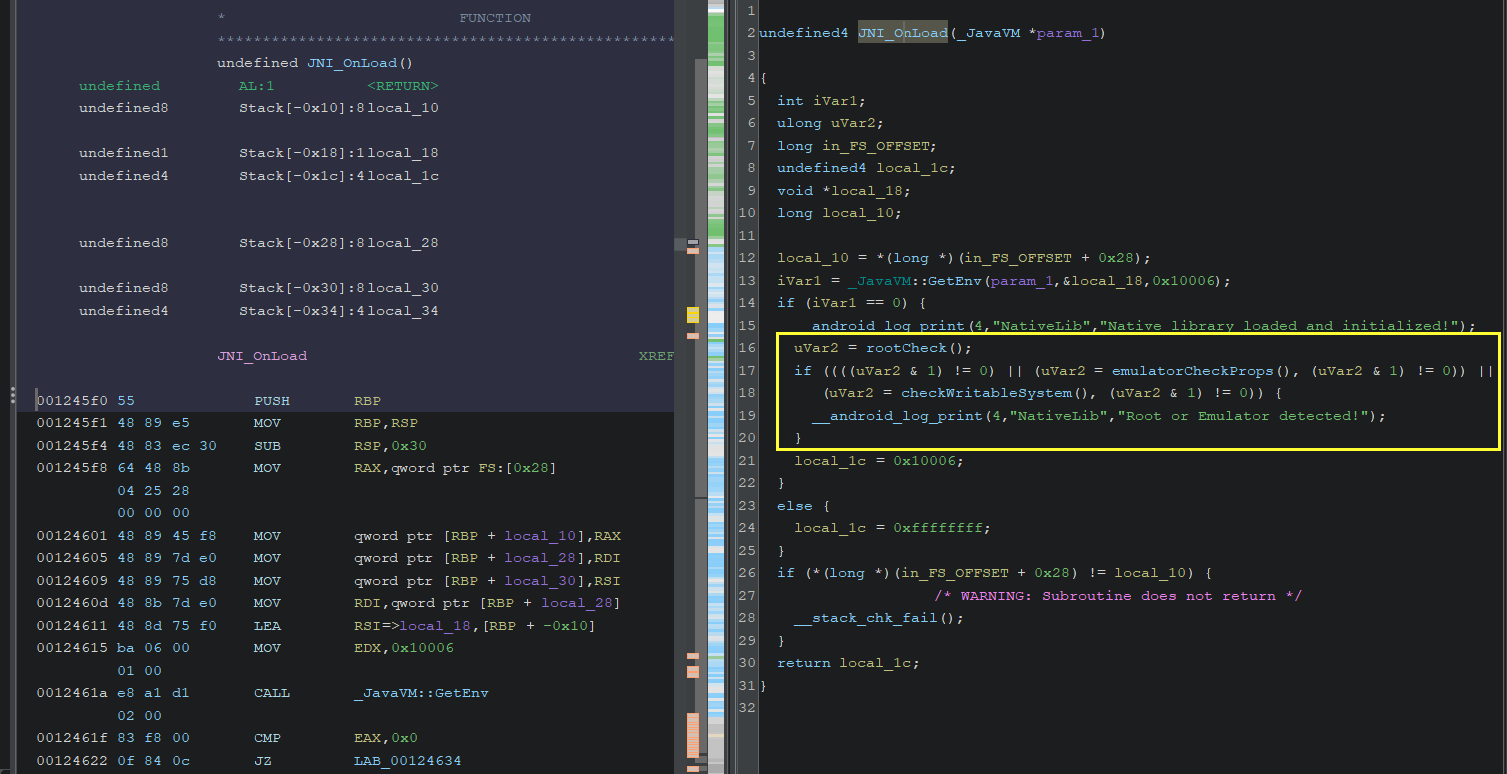
As you can see, Ghidra shows the entry point
JNI_OnLoad
and the other checking functions let’s check it.
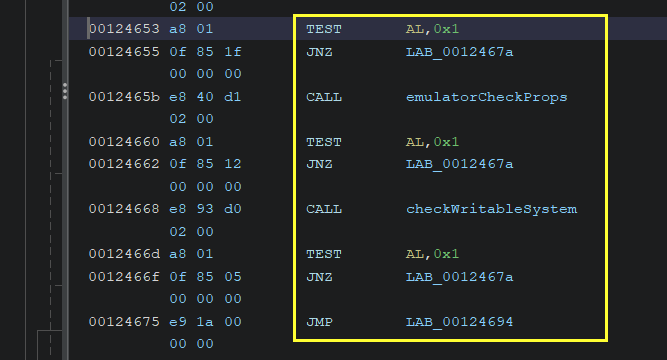
The easy way to bypass those checks is to look at the conditions
in the if statement and patch the corresponding instructions one
by one by replacing
JNZ
with
JZ.
However, sometimes the decompiled code won’t be that easy to find the checks right away. In that case, you should look for the checking functions one by one and try to patch them.
Debug release with x86_64 mode has been used in this example so that the process can be easy to grasp. In release version, the vendor may apply complex optimizations and obfuscation techniques on the library to hinder bad guys from reversing it as I said.
Hooking
Technically speaking, hooking refers to the process of manipulate the application’s behavior or its methods at runtime. It’s like throwing a hook with the method’s name in memory and reimplement it with your own logic you want to execute. Most common tools such as Frida can be used to perform hooking in Android by writing JavaScript instead of Java. Hooking can be also benifacial when comes to monitor specific functions when it executes. In this part, we’ll implement some hooking scripts to intercept RASP methods and rewrite them.
Hooking Android Functions
Here’s an example of hooking
checkSuperUserBinary
function and make it always return
false.
It starts with getting the class name, then call any method
inside that class.
Java.perform(function() {
    // Find the class by its name
    var MainActivity = Java.use('com.example.app.MainActivity');

    // Hook the 'login' method in MainActivity
    MainActivity.checkSuperUserBinary.implementation = function() {
        console.log('Inside root check!');
        // Call the original login method
        return false;
    };
});
By the same logic you can intercept
checkForEmulatorProps
or any other function you want to rewrite or overwrite its
return value.
Only static methods can be reimplemented using frida with its public calss. If the function is non-static, this script might not work and you have to find another workaround to intercept it though.
Hooking Native Functions
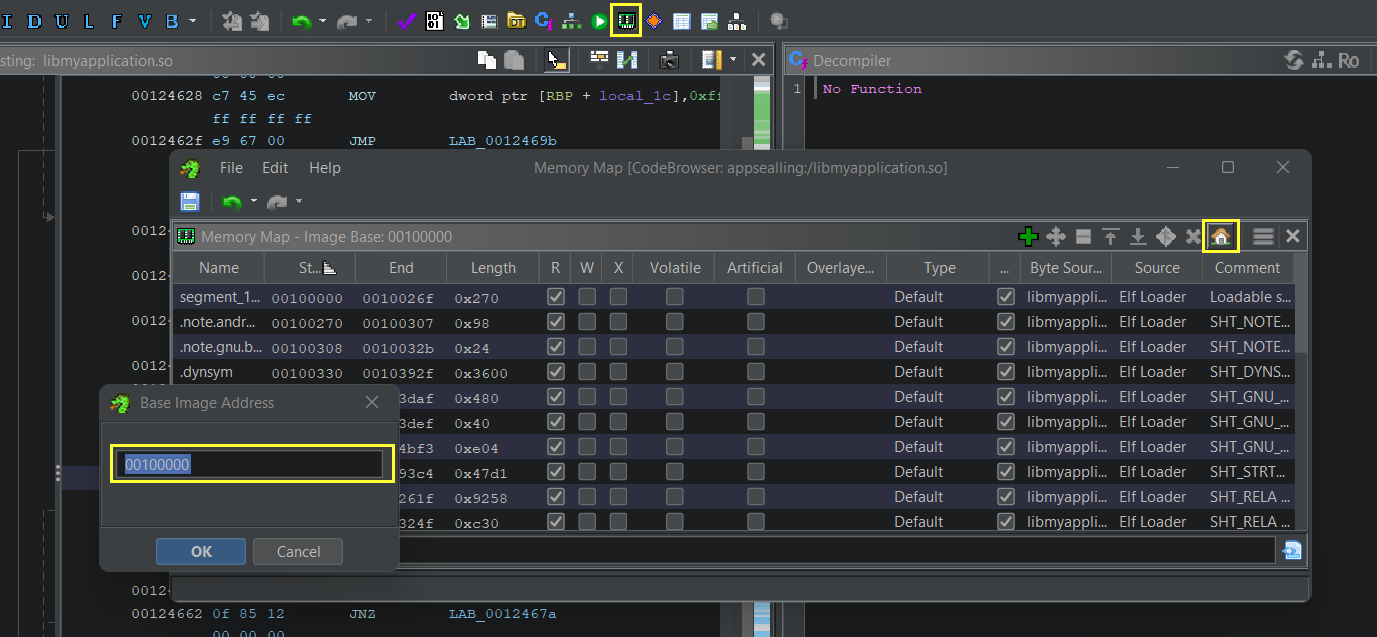
Native hooking isn’t that straightforward like in Android since the library is loaded into the application’s memory and in order to access any functions exist inside. You have to find its virtual address first, then subtract it from the virtual adderes of the library.
const libImageBase = 0x00100000; //const moduleName = "insert module name here";
const moduleBaseAddress = Module.findBaseAddress(moduleName);
const functionRealAddress = moduleBaseAddress.add(0x00123cf0 - libImageBase);
Interceptor.attach(functionRealAddress, {
    onLeave: function(args) {
        return false;
    }
});
Base lib address can be found in (Memory Map -> Set Image
Base) as seen in the image below
0x00100000. The
findBaseAddress
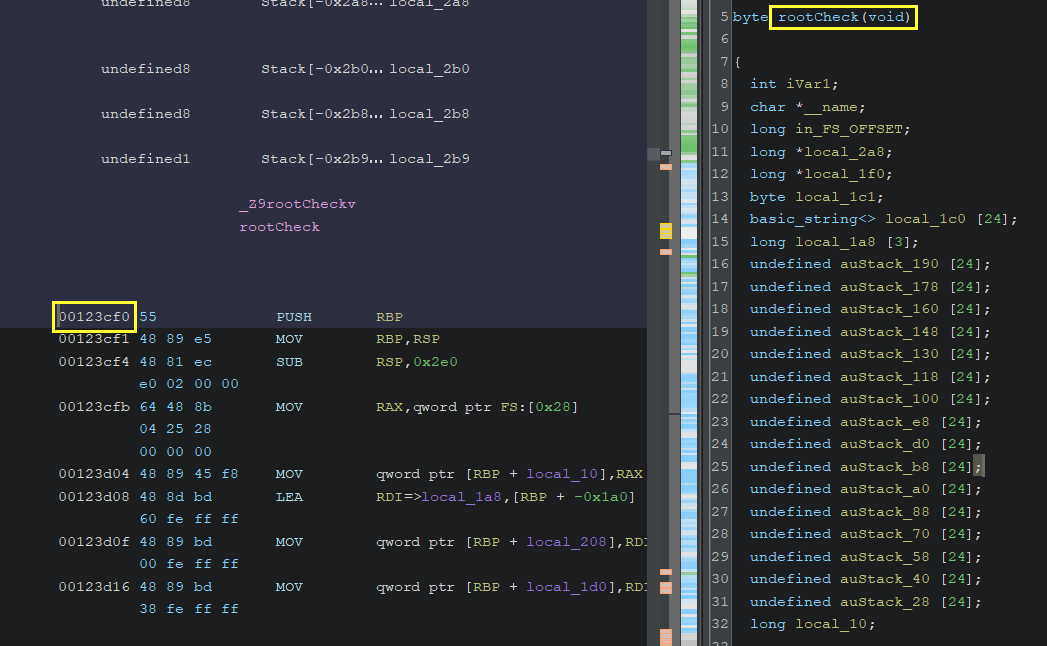
gets the loaded library address in memory.
Function address can also be found while clicking on the method
name and in the instruction part you can find the beginning of
the function
0x00123cf0.
By subtracting the function address from the image base adderes,
it gives how far the function it would be in memory from the
physical library start address. That would be
0x23cf0
for the
rootCheck
method. You can do the same process for the remaining check
methods.
Conclusion
In this blog post, we’ve discussed various methods of how Android RASPs can be implemented and how you, as a pentester, can bypass them. Of course, there are some proven solutions that are not susceptible to all the bypasses explained in this blog. However, there’s usually a flaw somewhere in the code waiting to be exploited. In the end, RASPs aren’t a bulletproof shield for Android apps. By understanding how they work and are implemented, you can easily spot the flaw.
Happy Hacking! 🧑💻


